
How to send records to a data source from Zapier or n8n
Last updated
A Zapier or n8n data source lets an automation you already run keep your Sendtric data up to date. Your Zap or workflow sends records to a Sendtric webhook, and your images look them up when an email is opened. Because it connects through Zapier or n8n, your data can come from almost any app, like Google Sheets, Airtable or your CRM.
Create the data source
- In the left sidebar, click Data sources, then New data source.
- Under API, choose Integrations and click Continue.
- Choose Zapier or n8n and click Continue.
- Fill in Data source name, Unique identifier field (for example
customer_id) and, if you like, Description. Every record you send must include the identifier field. - Click Continue. Sendtric creates the data source and shows the Webhook step.
- Copy the webhook endpoint and the API key. You'll paste both into Zapier or n8n.
- Click Continue. On the Records step you can import records you already have (see below), or click Finish.
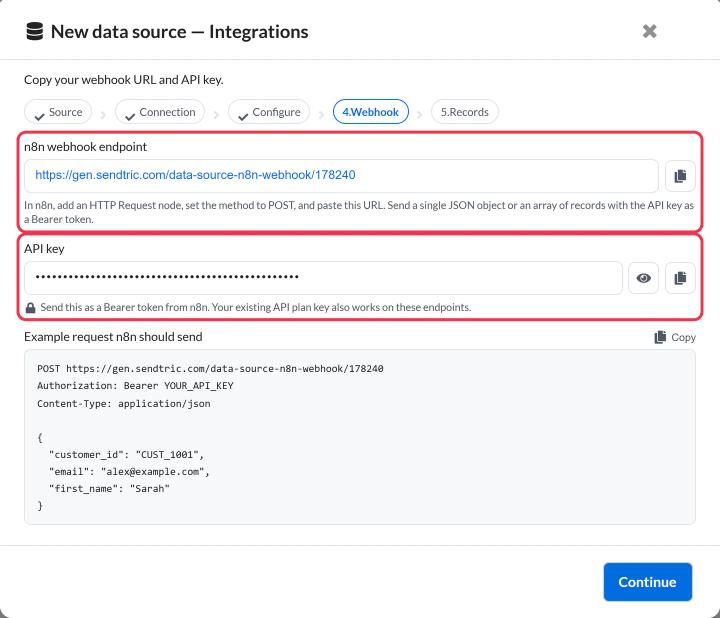
You can find the endpoint and key again on the data source's API Details tab.
Send records from Zapier
- In your Zap, add an action step and choose Webhooks by Zapier.
- Choose POST as the event.
- Paste the Sendtric webhook endpoint into URL.
- Set the payload type to JSON and map your fields into the data, including the identifier field.
- Add a header named
Authorizationwith the valueBearer YOUR_API_KEY, using the key you copied. - Test the step, then turn the Zap on.
Send records from n8n
- Add an HTTP Request node after the node that has your data.
- Set Method to POST and paste the Sendtric webhook endpoint into URL.
- Under Send Headers, add
Authorizationwith the valueBearer YOUR_API_KEY. - Under Send Body, choose JSON and send the record's fields, including the identifier field.
- Run the node once to test it, then activate the workflow.
Sending more than a few hundred records at a time? Set up batching so the workflow stays within limits. How to send large amounts of data to a data source covers the n8n settings and a ready-made workflow you can import.
What Sendtric accepts
The webhook takes one JSON object or an array of objects:
[
  { "customer_id": "CUST_1001", "first_name": "Sarah", "points": 1250 },
  { "customer_id": "CUST_1002", "first_name": "James", "points": 300 }
]- A record with a new identifier is added. A record with an existing identifier replaces the old one, so send every field each time.
- Records usually appear in Sendtric within about a minute.
- Records without the identifier field are skipped.
Import your existing records
The webhook only receives records when your automation runs. To load what you already have, upload a CSV:
- On the Records step of the setup (or the Import records tab of an existing data source), choose your CSV file. It must be under 5 MB.
- Leave CSV has headers ticked if the first row holds column names.
- Check the Field name for each column. One column must be named exactly like your unique identifier field.
- Remove any column you don't want to import.
- Click Import & finish during setup, or Import records on the tab.
Deleting records
Zapier and n8n only send new and updated records to Sendtric, not deletions. If a row is removed in your app, delete the record in Sendtric too: open the data source, go to Records and click the delete icon next to it.
Next step
- How to use a data source in a personalized image
- How to use a data source in a rule-based image
- What are data sources and how do they work?
Was this article helpful?
Thanks for your feedback!