
How to make a timer clickable with Dynamic Links
Last updated
A timer can link to a page, like your sale, when someone clicks it. With Dynamic Links you can go further: send clicks to one page while the countdown is running and to a different page once it has ended, so nobody lands on an expired offer.
Make the timer clickable (all plans)
- Open your timer and expand Additional Settings.
- Enter a Timer Link URL, starting with
https://. - Click Save and copy the code again. The link is now part of the code.
Use Dynamic Links (Power and above)
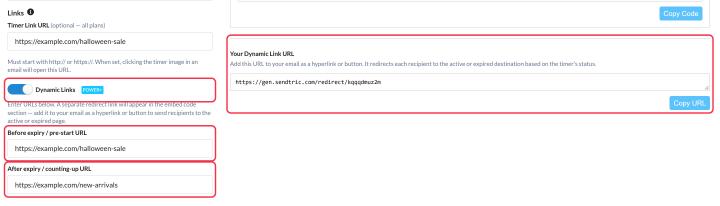
- In Additional Settings, turn on Dynamic Links.
- Enter a Before expiry / pre-start URL, for example your sale page.
- Enter an After expiry / counting-up URL, for example your full collection or a "sign up for the next sale" page.
- Click Save.
- Below the timer's code, copy Your Dynamic Link URL with Copy URL and use it as the link on your timer image, your call-to-action button, or both.
The Dynamic Link checks the timer every time someone clicks, so you can also change either URL after sending.
When Dynamic Links aren't available
- On count-up timers.
- On Start on Email Open timers without Unique User Timer, because each open would restart the countdown. Turn on Unique User Timer first.
For personal timers (Start on Email Open, Start on Email Send, Dynamic), the Dynamic Link URL contains the same merge tag as the timer code, so each subscriber is sent to the right page for their own deadline.
To learn more about email countdown timers, see our Email Countdown Timer page.
Related
- How to choose what shows when a timer ends
- How to set up a Start on Email Open timer
- How to add a countdown timer to abandoned cart emails
Was this article helpful?
Thanks for your feedback!