
How to create a personalized image
Last updated
Image Personalization puts subscriber-specific text, like a name, city or discount code, onto an image when the email is opened. You design one image and every subscriber sees their own version.
Step 1: Create it and choose a background
- In the dashboard, open Tools and choose Image Personalization.
- Click Create New.
- Choose a starting point:
- Choose from Library: use your own image (the canvas takes its size).
- Solid background: a color, sized in pixels (default 600 × 400).
- Transparent background: no background (Power and above).
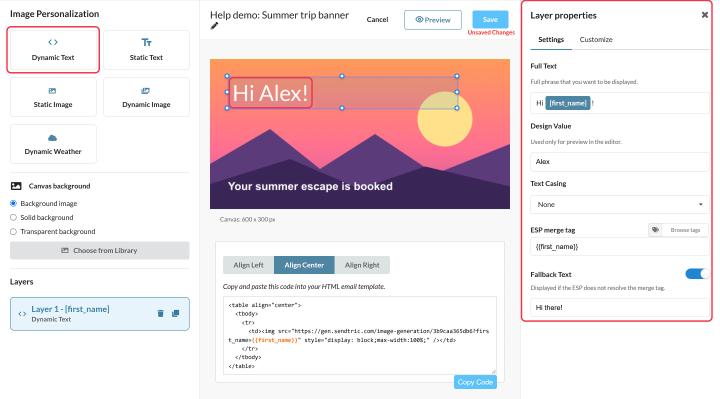
Step 2: Add layers
From the left sidebar:
- Dynamic Text: text with subscriber data in it, like "Hi [first_name]!". See how to use merge tags and fallback text in personalized images.
- Static Text: text that's the same for everyone.
- Static Image: a logo or product photo from your Media Library (Standard and above).
- Dynamic Image: a rule-based image, so part of the picture changes by rule.
- Dynamic Weather: a live forecast (one per image).
Use the Layers list to reorder layers (the top one is drawn on top), duplicate or delete them. How many dynamic text layers you can add depends on your plan: 1 on Free, 2 on Micro, 4 on Standard and 20 on Power and above.
Step 3: Style each layer
Select a layer, then use Customize on the right:
- Font, Font Size, Font color and Alignment. Your uploaded fonts appear under Your fonts on Enterprise.
- Position & Size: drag the layer on the canvas, or type the X, Y, width and height.
- Add Background: a colored box behind the text, with rounded corners if you like.
Text wraps inside its box but doesn't shrink to fit. Make text boxes tall enough for your longest realistic value (a long name or city), and preview with that value as the Design Value.
Step 4: Save and add it to your email
- Click Preview to check your design, then Save.
- Below the editor, choose an alignment and click Copy Code.
- Paste it into an HTML block in your email. Each variable appears in the code with your platform's merge tag, for example
?first_name={{first_name}}. - Send yourself a test.
Ideas
- Travel itineraries with each traveler's destination and dates.
- A year-in-review email with each customer's stats. Our guide on creating a Wrapped email walks through it.
- Loyalty tier and points balance on a member card.
To learn more about personalized images, see our Personalized Images for Email page.
Related
- How to use merge tags and fallback text in personalized images
- How to create a rule-based image
- How to put one widget inside another
- How to upload and reuse images with the Media Library
Was this article helpful?
Thanks for your feedback!