
How to use a data source in a personalized image
Last updated
A personalized image can show values from a data source as text layers. Use it for anything your email platform doesn't hold, like each subscriber's points balance, their next delivery date or a store's opening hours.
Before you start, you need a personalized image and a data source. If you don't have a data source yet, see what data sources are and how they work.
Choose the kind of value
| Variable type | What it shows | Example |
|---|---|---|
| Dynamic single variable | The same value for everyone | Today's featured offer from one cell |
| Dynamic unique variable | Each subscriber's own value, matched by an identifier | "You have 1,250 points" |
Add a data source value
- Open your personalized image and click Personalized Text. The Insert dynamic value window opens.
- Click the Data source tab.
- Under How is the data delivered?, choose:
- Hosted data for CSV uploads and records sent with the Sendtric API, Zapier or n8n.
- Connected data for a data source that fetches from your own API.
- Under Variable type, choose Dynamic single variable or Dynamic unique variable.
- Pick your Data source.
- Fill in the fields for your variable type (below).
- Choose a Cache time (see below) and click Insert.
The value is added as a new text layer. Style and position it like any other layer.
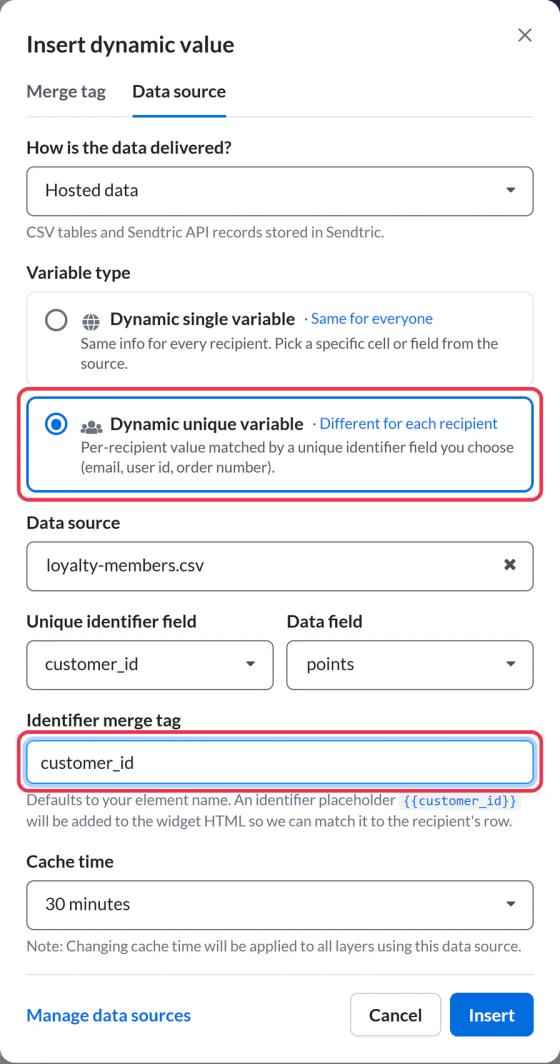
Same value for everyone
- CSV data source: enter a Cell Reference, like
B2, the same way you'd find it in a spreadsheet (row 1 is the header row). Sendtric shows the cell's current value so you can check it. - API, Zapier or n8n data source: enter a Unique identifier value to pick one record, then choose the Data field to show.
Each subscriber's own value
- Unique identifier field: the field Sendtric matches subscribers on. For a CSV, pick the column, like
customer_id. For other data sources it's the identifier set when the data source was created. - Data field: the value to show, like
points. For API data you can type a nested field too. - Identifier merge tag: enter a name for the link parameter that carries each subscriber's identifier, like
customer_id. Insert stays disabled until it's filled in.
Add the identifier to your email
For a unique variable, the image code includes a placeholder for the identifier, for example:
...?customer_id={{customer_id}}When you copy the code, replace {{customer_id}} with your email platform's merge tag for that same value, just as you do for other personalized image variables. See how to use merge tags in Sendtric widgets for the tag format in each platform.
The merge tag must fill in the same value that's in your data source. If your data source uses customer IDs, the merge tag must output the customer ID, not the email address.
Cache time
Cache time (2 to 60 minutes) is how long Sendtric keeps a generated image before building it again with fresh data. Shorter times show changes sooner. Longer times load faster for repeat opens. The setting applies to every layer in the image that uses the same data source.
When there's no value
If a subscriber has no matching record, or the field is empty, the layer is hidden in their email. The editor preview still shows a sample value, so send a test to a real contact to see what subscribers get. Keep the text around the value in the same layer, so it disappears with it.
Related
- How to use a data source in a rule-based image
- How to use merge tags and fallback text in personalized images
- How to add a widget to your email
Was this article helpful?
Thanks for your feedback!